 home page")
| Please Read: How to Help Our Site at No Cost to You - Some of our articles contain recommendations for products we like and vendors we personally trust. Some of those vendors may pay us a very small commission if you click on a link and buy their products. This costs you nothing at all and helps offset the costs of what we do. So if we point you to something you decide to buy later, please make certain you come back through our site and click on the link directly. Thanks. |
| This Site is a Cookie-Free Zone - Except for discussion forums that you have to expressly register for, none of our pages use cookies of any kind. Some of the vendors we link to do, but that won't affect you unless you click on a link to their pages. Your continued use of this page indicates that you agree to our policy. For details, click here. |
| Written by Paul Race for Creek Don't RiseTM |


|


Restoring Two Student Mandolins
If you want to learn about setting up, restoring, or just tweaking fretted instruments, start with some beaters. In high school and college, that's all my friends or I could afford, and I spent many a fun-filled hour fixing damaged instruments for them and me. Yes, it was fun for me.
I have never yet done the kind of restoration that involves things like melting the glue and disassembling the instrument's body or resetting the neck. But I've done lots of refinishing and setting up over the years.
This year's project involved two mandolins, one bowl-backed mandolin from about 1900 and one modern Ibanez student A model that had suffered serious cosmetic damage.
Warning, this article has a lot of detail that won't apply to most players, but I wanted to give a careful account in case someone acquires a similar instrument and wonders if it can be cleaned up, made playable and used. If you find yourself frustrated by every single detail I mention, that's fine. Just remember it's here in case you find yourself faced with a similar project in the future.
Why did I do two restorations at once? That wasn't my original intention, but I wound up having down-time on one while I waited for things to dry, etc., so I picked up the other one until I had to wait on something for it. Then I would go back to the first one. Again, not everybody would have two similar instruments on the workbench at the same time.
I acquired both cheap from online auction sites. 
- The bowl-backed one was a lark just to see what it was like to play one. I also thought about using it in historical reenactments.
 This style instrument emerged in the late 1700s and was more or less "standardized" as far as tuning and most features were concerned about 1850. Which would push it back as far as my earliest "Civil-war-friendly" guitars.
That said, mandolins of this design were still in use (though fading) by 1920, so that's a wide range of periods it could be used for.
 The Ibanez was intended to keep in my workshop, so I could keep my better instrument in the house away from heat and cold extremes.
One important feature was the adjustment rod in the neck. The neck of my first mandolin, a Hondo made in the 1970s, warped so badly that it was unplayable within a few years.


Issues
Because both mandolins were ordered from a no-return site, I knew I would have to deal with whatever I received. Needless to say, the strings needed to be replaced on both instruments, but I always replace strings on any instrument I acquire, so that wasn't an issue.The Little Old Mandolin
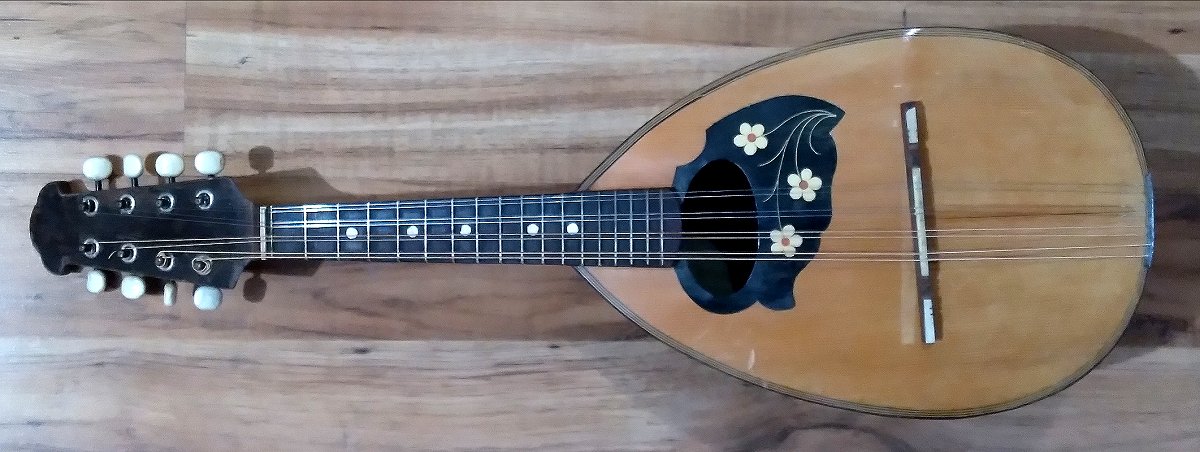
The bowl-backed mandolin has no manufacturer's information, but its build tells me that it pretty much has to date from 1880-1920. The celluloid pick guard uses a material that first rose to prominence about 1872. But most likely, it was produced around 1900, among hundreds of thousands of similar instruments during the mandolin craze of that period.
- The pick guard is curling very slightly, which means you can catch your fingers on it if you're not careful how you handle it, but it's not a big problem.
- The fret wire protruded over 1/16" out past both edges of the fretboard, making it potentially painful to play.
- The tuners were all very stiff. Two seemed to have been slightly bent, which might have contributed to the stiffness.
- The instrument had years of dust, and the face of the thing was dark, not with patina, but with worn-in grime.
- The fretboard, which seemed to be rosewood, had nevertheless dried out and had a shriveled appearance.
- The instrument had a crack on its face, running along the cedar grain (a very common issue with these).
Would I have paid $39 for it if I had seen it in person before I bid? Almost certainly.
The only problem I'm not equipped to fix properly is the crack in the face, and - the truth is - such cracks in my vintage guitars have never affected the sound, or got bad enough to endanger the instruments' structural integrity.
Holding my breath, I tuned up the strings that were on it to see if it would be playable. It actually was, thankfully. So even if it would never be a great instrument, at least I wouldn't be wasting my time.
The Ibanez A Mandolin
The Ibanez is one of their bottom line (Ibanez M510BS) models, but I knew it would probably be solid enough. I had an idea from photos on the auction site that there was a dab of glue on the face, probably from an attempt to attach a pickup of some sort.
I figured I could probably clean it off, and if necessary, even refinish the face. I was considering a darker, more primitive-looking finish anyway.
When it arrived, it turned out that the glue wouldn't dissolve no matter what solvent I used. And it was spread over much of the face of the instrument, which didn't show in the photo. There was a huge glob under the pick guard. So, a serious sanding job would ensue, even if I didn't necessarily hate the original paint job.
It was also one of the dustiest instruments I've ever seen, though the cure for that is easy.
I set the Ibanez aside with the idea of finishing the bowl-backed mandolin first. After all, I have another A-style mandolin in playing condition - this was just going to be a backup.
Getting Started
I removed the strings from the bowl-back - an interesting endeavor, since the last owner had done the "loop them around and run them back through the peg" trick. Plus two of the peg heads barely poked through, so that the hole for the strings was almost buried in the wood. While removing the strings, I lubricated the gears, using a product someone recommended to me - Tri-Flow TF0021060. It supposedly has a Teflon-type element that stays on the gears even after the oil has evaporated. I can't attest to its long-term effectiveness, since this is the first time I've used it, but it seemed to help.Six of the pegs freed up nicely. Two of them - the ones that looked like they had been kocked a little askew, never really loosened up. That's fine, once I get the thing tuned, I can live with two stubborn tuners. Surprisingly, the other six tuners are actually more precise than the tuners on most under-$1000 guitars.
Then I went over the face and the peg head again and again and again with a "cleaning" furniture polish. After three complete polishing jobs, you could start to see the cedar tones of the face. But enough of the polish had got into the fingerboard by accident, I wanted to let it dry out for a day before I conditioned the fingerboard. I also polished the bridge multiple times. It seems to be mahogany or some such, but it was also very dried out.
Starting on the Arch-Top - What to do in the meantime? While I was waiting for the fingerboard to dry out, I picked up the Ibanez, which I hadn't planned on working on yet. I removed the strings, pick guard, and tail piece. I also pried the bridge from the surface. It's supposed to be free-floating, but, as I said, the glue had got everywhere.
When I pulled off the pick guard, the mess of glue underneath it brought off some of the sprayed-on finish, leaving a blond spot of spruce showing. It looked nice. I was able to sand off some of the glue without really damaging the surface, but not all of it.
 After a while I gave up and kept going. I started with 220 grit 3M Pro Grade, and finished with 600 grit.
While I was at it, I sanded the Ibanez label off the headstock. It sits between the clear topcoat and the brown stain, so the stain was still intact, though I may need to apply a little varnish or something to that bit of the headstock to keep it from looking too silly.
I wanted a hand-rubbed finish, but as it turned out, the stain I planned to use has been discontinued, so I went online shopping for alternatives. While I was waiting for my next trip to the hardware store, I sprayed fretboard conditioner (Gerlitz Guitar Honey Fretboard Treatment) onto the fretboard.
It was stuff you were supposed to spray on and wipe off after a few minutes, but on instruments that have been neglected for years, I've never discovered a problem with leaving it on until it completely absorbs.
Fixing the Killer Fretwires on the Round-Back - Then I went back to the roundback. I had been wondering if the fret wires sticking out so far might have been a result of the neck and fretboard drying out for, say, the last 120 years. So I had thought about reconditioning the fretboard and then addressing the fret wires if they still needed addressing. But on closer examination, the mandolin's top and bottom strings were far enough inside the edge that losing a bit of fret on each end wouldn't be a problem.
I took an ordinary flat file that I've owned for probably fifty years and filed the ends of the fret wires down until they were just about even with the edge of the fretboard. During that exercise, the fretboard stayed the same color even where I may have grazed it with the file - a sign that it is solid rosewood or whatever, and not just painted dark like many cheap instruments' fretboards of the era.
Then I cleaned the fretboard, sprayed conditioner onto it, and let the mandolin sit overnight. By morning the "Guitar Honey" as completely absorbed, a sign that the fingerboard hadn't been conditioned for decades.
 Final Cleanup and Restringing on the Roundback - The next day, I polished the entire face again. After waiting to make certain the polish was dry, I restrung the instrument. While tuning it up, I kept adjusting the location and tilt of the bridge to get the optimum intonation - an old banjo player's trick. You can tell by the lighter strip on the face where the bridge had sat for, say, 120 years. But I'm slightly more interested in playing in tune than maintaining the optics.
Within a few days after the last polishing job, the face of the instrument started to get a little duller again. So I'll assume it will need polished every time I change strings. Sooner or later, it should "settle in," there's just a lot of neglect to make up for.
You can still see the crack in the face. Yes there are ways of fixing the cosmetics of that without taking the instrument completely apart, but I'm not sure there's a point to that.
Testing the Roundback - Once tuned up, it had a sweet tone, though it was not loud or rich in the lower registers. Given its development as sort of a "soprano mandola," which would originally have been played alongside bigger instruments with deeper tones, that's not surprising. But folks used to modern mandolins might be disappointed.
Another "issue" is that mandolins of this era never had straps. Instead, they had fake tailpieces you would press your wrist against to hold the instrument against your body while you picked the strings. The only reason I miss having that on this instrument is that the wound ends of the string come up over that corner, and resting your wrist on them can be uncomfortable.
Even with that accommodation, keeping the round back from sliding down your belly can get interesting. I have to hold it chest height, firmly clamped with my right arm.
That said, the roundback 1900ish mandolin is as "finished" as it's going to be for the foreseeable future. Storage will be another issue - I don't have a case or gig bag for it yet, and I don't trust most of the ads for them.
Back to the Ibanez - I tried staining the face with Watco "Danish Oil" "Dark Walnut" stain, but the stain didn't take at all. I realized that the razor-thin slice of spruce they put on to make the thing look like a real music instrument has a sealant on it that I would have to sand through, even though I'd already sanded through the top clearcoat and the sunburst stain level.
During that additional sanding effort (which was not trivial), I sanded right through the veneer in two places. Did I tell you that the spruce veneer is razor-thin? The grain of the underlying wood runs the opposite direction. Ooops. Well, if the whole thing takes the dark stain evenly, it won't show that much.
Don't Try This At Home - Just kidding. Just a reminder that I am restaining this mandolin because the face was so badly damaged by amateurish gluing jobs. I would not recommend restaining a veneer-topped mandolin just because you didn't like the color. If you want a brown mandolin, buy a brown mandolin. They're out there.
When the staining part of the project went south, I could have chunked the whole project. After all, I had very little invested financially. But I'm stubborn, and turning basket cases into musical instruments is a longstanding hobby.
 Staining the Ibanez - When I was sure I had all of the sealer off of the razor-thin spruce veneer, I tried staining the top again, still using the "Danish Oil" "Dark Walnut" stain. After all I hadn't really given it a fair chance before.
It took, sort of. Then I stained it again, about four more times. It looked more even by the time I was done, but it wasn't much darker.
Okay, next time I need a really dark walnut stain, I will not use "Danish Oil." My guess is that if it was a piece of pine, it would have looked like Ethan Allen or something after the first applicatioin. But for some reason the spruce didn't really take the stain the way I hoped. Maybe because it was too shallow for anything to really sink in.
That said, where I went through the spruce veneer around the F holes, it took very well. I stained it five more times. It didn't get much darker, but it got more even.
Don't worry, I had plenty of other things to work on while the stain was drying.
Polyurethane Finally, the finish was about as dark as it was going to get, and I was, frankly, tired of the thing sitting on my workbench.
 I had a number of polyurethand cans left over from previous products, and I elected to use a Minwax water-based poly with a satin surface.
The first time I brushed it on, I noticed a human hair had got trapped in the coat. It was still very wet, so I wiped all the poly off that would come off. The tiny bit that was left seemed like it would dry smooth (it did).
When I came back to it the next day, that very thin coat had added a sort of "seal coat" feeling. I put on two more coats, which did make the face of the thing look a little richer and more "finished."
Before I started final assembly, I lightly sanded the face of the peg head and hit it with two coats of the same polyurethane I used on the body. It's still very dark, and it's not as smooth as if I'd removed the pegs before I did it. But it is a better match for the finish on the face, and the place where I sanded off the Ibanez decal is less obvious.
Reassembly Here's another embarrassing bit. When I went to put it back together I couldn't find the bridge. It must have got in with another project I was working on. To get this one finished (for now), I "borrowed" the bridge off another student mandolin. Depending on how it comes out, I may buy a better bridge for it anyway.
Then I dug out the "light" mandolin strings I had ordered some time back. Oops, they're not light, they're medium. The vendor shipped the wrong strings and it's too late to send them back. Fine, it's probably what the Ibanez came with in the first place anyway. And who needs freedom from finger joint pain, anyway? Mandolin M400, 80/20 bronze it is.
Putting strings on an A-style or F-style mandolin is a little more complicated than putting them on a guitar, because the strings don't lock into place at the bridge end before you start tightening them. I wound up starting at the peg, letting the bridge end hang out over the end of the mandolin. I kinked the string at the peg like you do on guitar, then held the string tight with my left hand as I cranked and cranked with my right hand. When the loop end was within an inch of the hook it was supposed to fasten to, I hooked it and kept the string tight with my left hand until it settled in place.
It's most interesting on the first two strings, before the bridge is in place, because the bridge is free to wander about until you have some strings sitting on it with at least some tension.
Confession - I kinked one of the E strings too far down, and had to unkink it and pull it toward the nut before I could hook the loop onto the tiny hook. Needless to say, it broke when I tried to tune it. Fortunately, I ordered some bulk banjo strings a while back, and I can replace it from that stock.
Also, the bridge settled too far "south" so I had to loosen the strings and reset it once I had all the strings on. I used the old banjo player's trick of checking the pitch of the overtone on the 12th fret of the lowest string against the pitch of the string when it is fretted there. So there's a very slight angle to my bridge at the moment. But it did scratch the face slightly while I was skootching it around. Well, I wanted it to look vintage.
Once the strings settle in pitch-wise, I'll revisit the bridge placement.
For comparison, here are both instruments, after cleaning, conditioning, adjusting and restringing (plus refinishing on the Ibanez). Click on the photo if you want to seem them bigger.

In case you wondered, the backs of these things are much the same as they started out.
Testing, Testing - In the meantime, it sounded surprisingly loud and rich for a plywood mandolin. I played the same chord sequence on the Ibanez and the round-back mandolin. There is no question that the Ibanez had a much fuller sound, even though my round-back mandolin has a solid top.
Again, those little round-back mandolins were designed to be the "soprano" voice of the ensemble, so having bright upper tones was the important thing - not having rich lower tones. My round-back is loud in the upper registers. Still it's not hard to understand why A and F-style mandolins crowded roundback mandolins out of the North American market almost as soon as they appeared. Or even how Bill Monroe's A and F-style mandolins contributed to his sound.
My friend Geoff's solid-faced custom F-5 style mandolin will still be much louder, I know, but for practice, for learning, for Folk jams, etc., the Ibanez will do just fine.
Acoustic Bluegrass jams up against folks with true Bluegrass banjos? I'd probably want a solid faced instrument.
Related Articles
- About Mandolins- An overview of mandolin history, including musical styles and tuning conventions.
- Mandolin for Guitarists - A guitarist's introduction to the differences and potential obstacles he or she will encounter when picking up a mandolin, as well as a method for learning the basic chords quickly.
- German Dome-Back Mandolins - A unique style of mandolin that was manufactured by Bavarian guitar makers from about 1930 to 1948. Sadly, they were driven out of business by East Germany's policies, but the design had potential.
- Mandolin Buyers' Guide - To keep from filling my reference pages with product ads and recommendations, I set up an entirely separate site (RiverBoatMusic.com) for listing products that are worth considering from vendors who are reasonably trustworthy. The Mandolin "Buyers' Guide" is here.
- For information about other music collections and projects, check the links at the bottom of this page.
 Whatever else you get out of our pages, I hope you come away with some great ideas for "sharing the joy."
And please stay in touch!
- Paul Race
![]()
![]()
![]()
![]()


![]()
![]()
![]()
All material, illustrations, and content of this web site is copyrighted (c) 2001, 2002, 2003, 2004, 2005, 2006,
2007, 2008, 2009, 2010, 2011, 2012, 2013, 2014, 2015, 2016, 2017, 2018, 2019, 2020, 2021, 2022 by Paul D. Race. All rights reserved.
Creek Dont' RiseTM is a participant in the Amazon Services LLC Associates Program, an affiliate advertising
program designed to provide a means for sites to earn advertising fees by advertising and linking to Amazon.com.
For questions, comments, suggestions, trouble reports, etc. about this page or this site, please contact us.
| Visit related pages and affiliated sites: | |||||
| - Music - | |||||

|
 |
 |

|

|

|

|

|

|

|

|

|

|

|

|

|

|

|
| - Trains and Hobbies - | |||||
 |

|

|  |
 |

|
| - Christmas Memories and Collectibles - | |||||
 |

|
 |

|

|
|
| - Family Activities and Crafts - | |||||
 |

|

|

|

|

|