Acoustic Instrument
Primers
What Kind of Guitar
Should I Start On?
What Kind of Banjo
Do I Want?
Evaluating and
Buying Used
Guitars
Setting Up
Fretted Instruments Whatever Happened
to the Banjo?
Beginning Five-
String Banjo
6-String Banjos
Banjo Pickups
Axes in my Life
What is a
Bluegrass Banjo?
Dean "Backwoods
Six" Shootout
Music Theory
Primers
Introduction
to Scales
Introduction
to Chords
Circle of Fifths
Other Articles
About Music
How to Give
Guitar Lessons
Musician or
Wannabe? Did God Really
Give Rock &
Roll to You?
Are You a
"Brand Bigot"?
Who Owns Folk Songs?
Historical Links
About the
National Road
The Story Behind
the Story - Real
People, Places,
and Events
About the Play
Play Home
What's New
Overview
About the
Music
About the
History
About the
Logistics
About the
Cast
Synopsis
About the
Set
About the
Author
Contact Us
Home
 Setting up a Five-String Banjo
| Written by Paul Race for Creek Don't RiseTM |
If you ordered a banjo online and spent less than $2000, your banjo will not be ready to play when it comes out of the box. In most cases the banjo is shipped with the bridge packed separately and the strings untuned. That's a good thing, especially if your banjo came from China. Otherwise, the chances of your banjo arriving with the bridge smashed are very good. If you bought a really expensive banjo, placing the bridge may be the only work you have to do before tuning and playing it.
However, 999 out of 1000 banjos made in China never had the head tightened properly or neck adjusted before they went into the shipping container. The inspector is supposed to make certain that all the pieces are there, and nothing is seriously damaged (sometimes they miss that one), but they do not take the time to do the work necessary to try them out. So it will take you a little work to make all those pieces work together the way they should. If you have a full-service music store near you and are willing to pay list price for a banjo that was really ready to pay (or else buy at a steep discount and spend maybe $75-150 paying for the setup separately) , you can avoid the hassle. Otherwise, you are getting exactly what you paid for.
If you aren't used to setting up instruments yourself, get someone who is to look at it right away (while you still have return privileges). I believe that most folks who give up on banjo within a month of its arrival do so because they don't know how to make the thing playable - they either assume that they got a piece of junk or else that they lack the musicianship to get decent sounds out of the thing. (The rest believed the jokes about all banjo players being idiots, and therefore they figured they'd be as easy to learn as, say, a kazoo.)
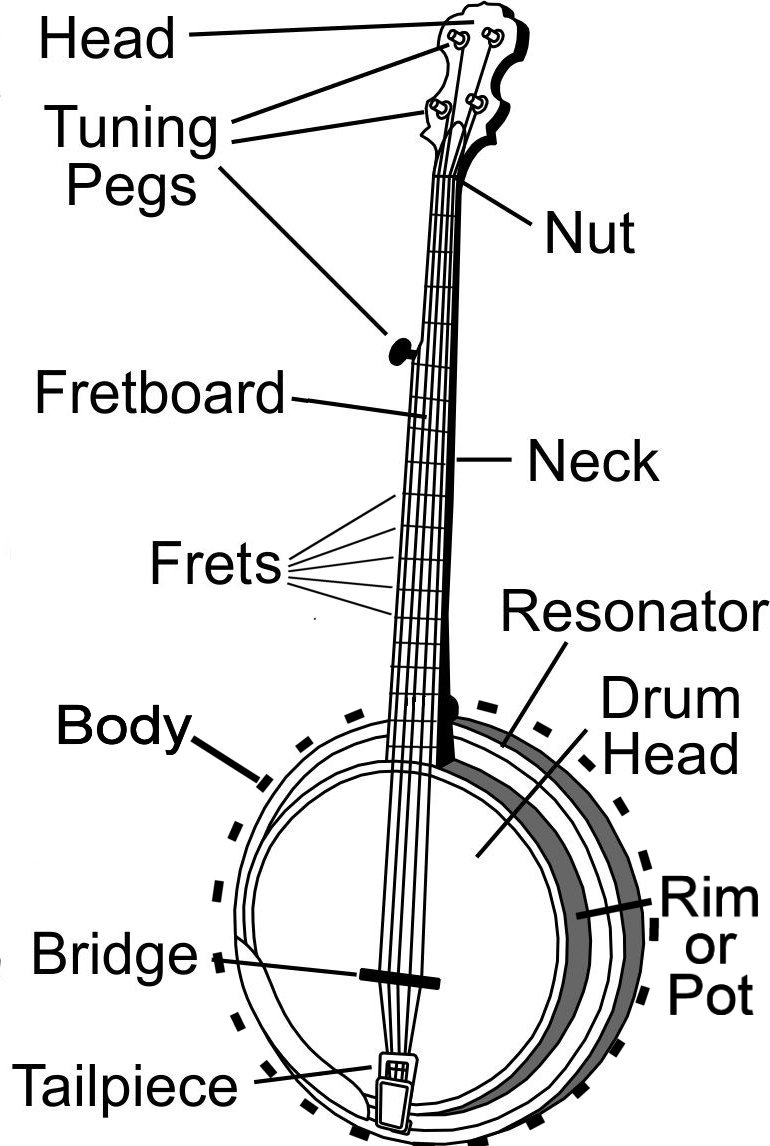
This page is intended to get you past the not-knowing-what-you're-looking-at-or-how-to-set-it-up hurdle. (Our Beginning Five-String Folk Banjo pages are to get you past the how-do-I-get-actual-music-out-of-this-thing hurdle.) The picture to the right is just to get you acquainted with the major parts of a banjo, so if you're a complete newbie, the following sections will make more sense. Banjo terminology varies among player communities, so you might see or hear things called differently.
The part that the drum head stretches across and the neck connects to has a number of names: "pot," "body," "shell," "rim," etc. The tuners are sometimes called "tuning pegs" or some such. The head with the tuners is often called the "peg head." On the other hand, the drum head is often called just the "head," so you may have to listen to the whole sentence to know which "head" the speaker is talking about.
Also, resonators are optional. These are bowl-like wood pieces that attach to the back of the banjo's pot to reflect sound from the back of the drum head (and keep it from being absorbed into your belly). A "backless" banjo is one that does not have a resonator. This reduces the volume and sustain, which helps strumming styles to sound better.
Two other parts you can't see in the drawing are the coordinator rod(s) and the optional tone ring. The coordinator rod runs under the drum head between the heel and the tailpiece. On cheap, backless, or lightweight banjos, there is usually only one rod. On heavy and higher-priced banjos, there are usually two. This adds stability and helps keep the banjo from going out of tune if you change position while you're playing it, which can happen with cheap banjos.
Note: - On "pop-top" banjos, the pot, tone ring, and resonator flange are all replaced by a single piece of metal, usually cast and milled aluminum. This gives them more volume and sustain than cheap wooden-pot banjos that lack a tone ring, but it gives them a harsher tone than high-end banjos with wooden pots, tone rings, and solid resonator flanges. So you very seldom see a really cheap banjo or a really expensive banjo made this way. One thing about them that is a disadvantage to me is the shape of the "flange" with all those points. If you want to experiment with an open back banjo, don't get one of these, unless you want your banjo to double as a medieval weapon.
Put the Bridge On and Tune the Banjo - On most five-string banjos the bridge should be 12"-13" from the twelfth fret. Figure out which end of the bridge needs to go under the skinny strings, put the bridge under the strings, and start tightening the strings until the bridge stays in place by itself.
Fine-Tune the Bridge Placement - Hold your left forefinger finger on the fourth (lowest pitched) string just over the twelfth fret without pushing it down onto the fret, and pluck the string with your right hand. You should hear the "octave" overtone, a bell-like sound one octave higher than the sound of the string unfretted.
Now press the string down just behind the twelfth fret and pick it again. If the overtone is lower than the sound at the twelfth fret, move the bridge toward the tailpiece. Otherwise move it toward the neck. Note: This skootching back and forth will untune your banjo, but it's necessary. When you've got the bridge in the right place, you can retune.
Why does this work? When you make a string half as long as it was before it goes up an octave. In a perfect world, the distance from the 12th fret to the nut should be exactly the same as the difference between the 12th fret and the bridge. But when you push down on the string, you are stretching it just a little, so if the distances are exactly equal, the fretted string will be a tiny bit sharp. So you skootch the bridge toward the tailpiece a tad to compensate.
Once they are the same, compare the octave overtone on the high D (first) string to the sound of the same string fretted at the twelfth fret. This time you adjust by skootching just the end of the bridge. 90% of the time the bridge will not look "straight" when you're done. In most cases, the part under the skinny strings will wind up closer to the neck than the part under the heavy strings. sometimes there's quite an angle. Don't feel bad, this is normal, despite the nice "straight" bridges they show in the catalogs. Now retune the banjo.
For more information on bridge placement, check out the Deering article here.
Banjos are wood, steel and mylar (the head), and those thing expand and contract differently with changes in temperature and humidity. So they're designed to have a little "give." Otherwise things could snap if exposed to unexpected dry heat, for example. So when you do have to make an adjustment, it can be as much art as science
Unfortunately, there's no way to tell whether the following things are exactly right, so if you suspect the following thing are "wonky," you may want to pay a professional ot "set it up" the rest of the way or get a friend who knows banjos to show you how to do it. My preference would be the latter. Why? Because the banjo is part machine, and will need adjustment again at some point it its life, and you might as well know how to do it.
How tight is too tight? Well, having the banjo detune slighty when you change your body position radically is normal. For example if you strum the final chord of the song, then lift your the banjo up to the microphone, you may sense the banjo dropping a bit in pitch. This is normal. but going in and out of tune whenever you change chords is not. About one in five import banjos has this problem, so you'll probably dodge the bullet, but it's worth checking for. If you have this problem, you'll have to take the resonator off to fix it, but that's okay, since you'll probably have to take the resonator off to tighten the drum head anyway.
Does the Head Need Tightened? - Most banjos are shipped with the head fairly loose. Once you have the bridge in place, look to see if there is a really big depression in the drum head of the banjo under the bridge. In most cases, 1/8" is the max displacement you want to see. I prefer to see about 1/16" or less, but if this is your first banjo, you may want to err on the side of caution. To tighten the head, you need to take off the resonator. That's generally attached by four big thumb screws. But they're usually so tight you need a screwdriver anyway. Once you have the resonator off, locate the little wrench that came with the banjo. Loosen the strings a little, then start working your way around the banjo, tightening the nut on each bracket a quarter to half a turn at a time. If you come across one that isn't tight at all, feel free to snug it up until it's about as tight as its neighbors. That said, snugging one bracket tight will automatically make the two on either side a little looser, but you want to snug them all up the same amount, a little bit at a time. Your goal is to get the same amount of pressure on the head all the way around. It will never get so tight that you can't turn the wrench, but you will notice a little more resistance as you go around the head again and again.
Some people try to tune their banjo heads up to specific notes, the way drummers do, such as a "G." You muffle the strings and tap the head so that you can hear the tone behind the thunk. Or not. Some folks can't hear it until they get more experience with the banjo.
When you can barely see a depression under the bridge, you're probably tight enough. If you can't see a depression at all, you're definitely tight enough. In fact, you may be a tad too tight. Don't bother loosening things, though - the head will loosen a bit in time anyway.
For more information on tightening your banjo's head, check out the Deering article here or check out the video here.
If the neck is bowed, locate the adjustment screw access. On most guitars, you can get to the end of the adjustment screw by unscrewing a triangular piece of plastic on the head. On some guitars, you can see the end of the adjustment screw at the bottom of the fretboard, just over the sound hole. If you can't find an adjustment screw period, the instrument may not have one, and the only "remedy" for a bowed neck may be to install lighter strings than you planned, which may reduce pressure on the neck enough for it to pull back a little.
Find a nut driver or hex screwdriver that fits the end of the adjustment screw. They're seldom metric, if that helps, and some instruments even come with them.
Loosen all the strings so they're a few steps flat. Loosen the middle strings enough to get the nut or hex drive into the end of the adjustment screw and make at least a partial turn.
Holding your face well away from the instrument, in case a string snaps, tighten the adjustment screw a bit, then sight down the neck and see if you're having any effect. Keep going until the neck seems fairly straight.
Retune the strings. If you have time, let the instrument sit a bit so the neck can decide whether it's happy where it is - sometimes the string pressure will pull it back into a bow even after you've tightened the adjustment screw.
The last few times I've set up used, but decent banjos or guitars, I've gone through this step several times. I leave the old strings on for this step, since all this tuning and detuning is hard on the strings, and I would rather beat up the old ones than prematurely age the new ones.
When you fret a string at the second fret (by pushing down on it between the first and second fret) the string should just about lay on the first fret, but it should not buzz against any other frets when you pick it. Try this on all five strings. Then do the same test on the third, fourth, and fifth fret. If you discover no buzz at all, you might be able to bring the neck back a little bit farther and improve the action.
Tighten the neck a little bit at a time, checking for fret buzz after each quarter-turn. Eventually you will get fret buzz somewhere along the neck. Once you do back it off a quarter turn and try again. Even if you get fret buzz now, the neck will adjust itself a little over the next day or so. Unless the fret buzz is so bad it will keep you from practicing the instrument, put the cover back over the adjustment screw hole, tune the instrument again, and leave the ajustment screw alone for a day or so. If after a day or two, there is still fret buzz, back the adjustment screw off another quarter of a turn.
Many instruments play best when the neck curves back very slightly so don't get nervous if the neck does that but everything else seems fine.
For more information about checking or adjusting your banjo's neck, check out the Deering article here.
For more information about the coordinator rod(s) check out Deering's video here.
The web is turning into a great place for keeping musical traditions alive. Many folks have spent many hours trying to share their own "lessons learned." If you're finding our resources or those we link to helpful, the best thing you can do is to learn what you can and pass on what you learn.
Return to our Tabs and Instructions index page.
Please get in touch.if you have found a resource you'd like us to add, if you'd like to ask questions, or if you'd like to sign up for our newsletter.
Please get in touch.if you have found a resource you'd like us to add, if you'd like to ask questions, or if you'd like to sign up for our newsletter.
- Paul Race
Five-String Banjo Parts
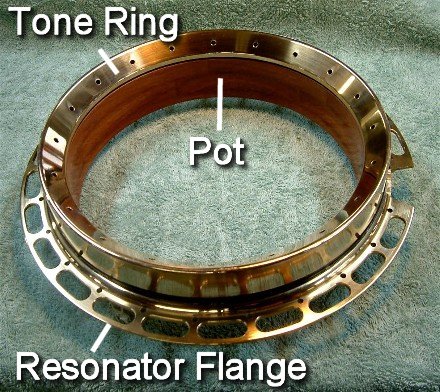 Tone rings, like resonators, are optional. They are metal rings, usually cast, that attach between the drum head and the pot. At the very minimum, they allow the drum head to vibrate more freely. Some have a bowl-like shape that is intended to reflect sound forward. Like resonators, tone rings increase volume and sustain, which may or may not be desirable for certain kinds of banjo playing.
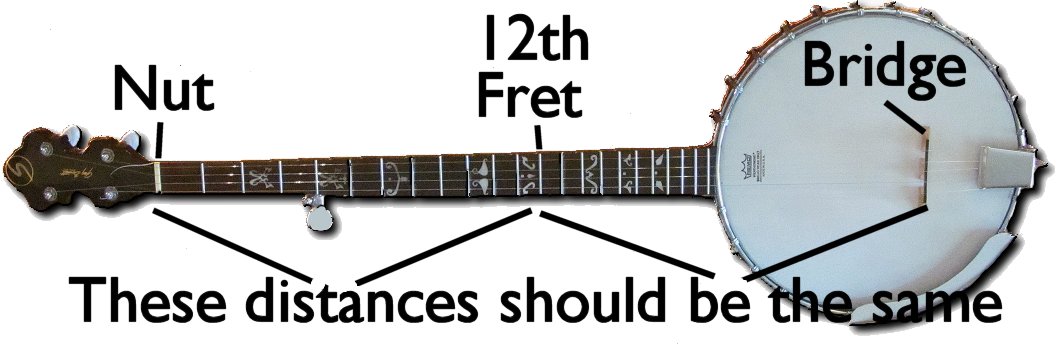 Now measure the distance between the nut and the twelfth fret. The distance from the twelfth fret to the bridge should be about the same. Tune the banjo up to the tuning you plan to use (usually DGBDg for Bluegrass or DGBCg for folk, starting with the highest string first). You may use a digital guitar tuner if you're not used to doing this by ear. A friend who plays a fretted instrument can help you with this part.
Checking Under the Hood
Now it's quite possible that placing the bridge properly is all you will need to do before you can start playing or learning on your new banjo. But many banjos ship without other thing being tightened as much as they should be. Even if they were set up perfectly, the trip across the Pacific followed by a train trip to the distribution center, by a truck trip to the store or your house, will probably cause your banjo to need "tweaking" by the time you get it anyway, so most manufacturers at the low end of the price spectrum don't even bother. Are all the parts there? Check. Are they fastened together well enough to come out of the box in one piece? Check.
Check Banjo's Pot-to-Neck Fit
Underneath the head of the banjo there is/are one or two long bolt-looking things that have the twin function of keeping the pot from distorting and holding the neck on the banjo with the right amount of stability. Check for excessive play or wobble between the neck and the body. It will never be 100% rigid, and trying to achieve that will probably break your banjo.
Checking/Adjusting the Neck
Check the neck for bows by sighting down each edge of the neck like an archer sites down an arrow to see if it's straight. It is possible that one edge of the neck seems more bowed than the other - which means that the neck may be twisted. It's also possible that the neck is bowed unevenly - part of the neck is nearly straight while another part dips or bulges. Either of those problems may signify an instrument that is irreparable without herculean effort. But most of the time the neck will either be straight or bow upward smoothly along most of its length, so that the fingerboard is slightly concave.
Check/Adjust Neck Curve, String Height
On most instruments that have any hope of being made playable, adjusting the neck will bring the strings close enough to the fretboard to play without serious pain. (If you're a new banjo player, you may have trouble distinguishing serious pain from newbie pain, but do your best.)
Check/Adjust Coordinator Rod(s)
If you can get the neck into playable condition without messing with the coordinator rods, great. Just leave them alone. Sometimes, though, your neck can be perfectly straight, and the strings are still a half-inch from the fingerboard by the 12th fret. If that's the case, try loosening the strings and tightening the coordinator rod(s) slightly, then retuning and trying again. If nothing seems to help, it's time to have a pro look at it, though.
Conclusion
Like Darth Vader, who's "more machine than man," your banjo has many mechanical parts that need to be in adjustment for maximum results. Hopefully you won't have to do all these tweeks on every banjo you acquire. If you had to do all of them on your very first banjo, you may have put in hours on the thing and still haven't got to learn the first chord. If that's the case, I am truly sorry. But you're still WAY better off trying to learn on a banjo that is in playing condition than one that is not.
All material, illustrations, and content of this web site is copyrighted ? 2001, 2002, 2003, 2004, 2005, 2006,
2007, 2008, 2009, 2010, 2011, 2012, 2013, 2014, 2015 by Paul D. Race. All rights reserved.
Creek Dont' Rise(tm) is a participant in the Amazon Services LLC Associates Program, an affiliate advertising
program designed to provide a means for sites to earn advertising fees by advertising and linking to Amazon.com.
For questions, comments, suggestions, trouble reports, etc. about this play or about this web page, please contact us.
| Visit related pages and affiliated sites: | ||||||
| - Music - | ||||||

|
 |
 |

|

|

|
|

|

|

|

|

|

|
|

|

|

|

|

|

|
|
| - Trains and Hobbies - | ||||||
 |

|

|  |
 |

|
|
| - Christmas Memories and Collectibles - | ||||||
 |

|
 |

|

|
||
| - Family Activities and Crafts - | ||||||
 |

|

|

|

|

|
|