Acoustic Instrument
Primers
What Kind of Guitar
Should I Start On?
What Kind of Banjo
Do I Want?
Evaluating and
Buying Used
Guitars
Setting Up
Fretted Instruments Whatever Happened
to the Banjo?
Beginning Five-
String Banjo
6-String Banjos
Banjo Pickups
Axes in my Life
What is a
Bluegrass Banjo?
Dean "Backwoods
Six" Shootout
Music Theory
Primers
Introduction
to Scales
Introduction
to Chords
Circle of Fifths
Other Articles
About Music
How to Give
Guitar Lessons
Musician or
Wannabe? Did God Really
Give Rock &
Roll to You?
Are You a
"Brand Bigot"?
Who Owns Folk Songs?
Historical Links
About the
National Road
The Story Behind
the Story - Real
People, Places,
and Events
About the Play
Play Home
What's New
Overview
About the
Music
About the
History
About the
Logistics
About the
Cast
Synopsis
About the
Set
About the
Author
Contact Us
Home


|

|


Beginning Five-String Folk Banjo - Part Three - Hammering On
| Written by Paul Race for Creek Don't RiseTM and School Of The RockTM |
This is a follow-up to our article "Introduction to Banjo Rolls." We are talking exclusively about 5-string banjo here. Four-string and six-string banjos may be played many ways, but the 5-string can do certain things that they can't. So that's what we're focusing on in this article series.
I hope you're continuing to practice your rolls. Because you'll never really move foward until you can do them in your sleep. Again, practice singing songs while you're practice your rolls - it will help your timing eventually. It will also help you develop as a musician and not just a banjo picker. (Sadly, not all banjo, or guitar, or saxophone players are musicians, really.) The roll we introduced last lesson has a "hole" in it. Our "bum-ditty bum-ditty" pattern (shown at the right) has something playing on the first half of every beat, and on the second half of It's important to remember, that whatever picking style you use to play this roll, every note you're playing so far is with your right hand.
Now that we've reminded you how a typical bano roll works. Wouldn't it be nice to put something on the second half of beat one and three?
There are roll patterns that add another note to pick with your riht hand, but we're going use another approach, using your left hand to add notes in those little "vacuums." While this may seem trivial at first, these techniques add a distinctive "color" to your banjo sound, and are critical for playing melodies, later on.
The tricky part at first will be doing it in time to the music. Also, it's best if you use it on notes you're going to fret anyway. That means it's especially useful on a D7sus7 chord and on a C chord, because there are low strings to fret.
Play your standard roll on the first two beats of the measure.
Practice playing that measure over and over again. From now on, whenever you play a Dsus4 with your standard roll, add that "lick." Note for Three-finger Pickers: - If you are trying to learn three-finger picking, you will probably only be playing one note on the beats that show two notes playing. Which note you play is up to you. In some cases, you'll want to choose the note that makes the chord sound more complete. In other cases, you'll want to choose the note that fills out or emphasizes the melody. Make the choice that seems right to you and enjoy your music. If you want to hear four measures of the pattern shown to the right, click the little icon below.
 beat 2 and 4.
Hammering On
If you have already picked a note with your right hand, and you fret it - hard - with your left hand while it is still vibrating, that's called "Hammering On." Here's an experiment. Get the middle finger of your left hand ready to fret the third (G) string at the second fret. With your index finger, pick that string while it is still open, then fret it almost immediately. The sound you get should be familiar, because you've heard it in about a million banjo solos. Now you know how they do it.
Hammering On a D7sus4 Chord
For your first exercise get your left hand in position to play a D7sus4 chord, but don't fret the third string just yet.
On the third beat, pick the third string without fretting it. 
Then fret it hard at the second fret, and continue playing the rest of the roll.
The tab for this measure is shown at the right. I put little arrow under it to show which notes are part of the "hammering on" excercise we're describing. I also put an "H" over the note that is produced by "hammering." To hear this measure repeated four times slowly, click the little banjo icon below:


 Note for Frailers: - If you are trying to learn a pattern that includes a downward strum with the back of the fingernail, you may find yourself playing three or four notes on the beats that show two notes playing in our tabs. As long as the additional notes you're playing are in the chord, it should sound just fine. For example in the D7sus4 chord shown above, you would play a normal D7sus4 chord the whole first beat. That way adding the third string on your "strum" will be playing a note that is already in the chord.
If you want to hear four measures of the pattern shown to the right, click the little icon below.
Note for Frailers: - If you are trying to learn a pattern that includes a downward strum with the back of the fingernail, you may find yourself playing three or four notes on the beats that show two notes playing in our tabs. As long as the additional notes you're playing are in the chord, it should sound just fine. For example in the D7sus4 chord shown above, you would play a normal D7sus4 chord the whole first beat. That way adding the third string on your "strum" will be playing a note that is already in the chord.
If you want to hear four measures of the pattern shown to the right, click the little icon below.
From this point on, we will only be showing one version of each tab, and it's up to you to make any adjustments.
Hammering On a C Chord
The C chord is used in almost every banjo song in the key of G. It also happens that hundreds of American folk songs in the key of G use a Low D to Low E note progression at some point in the melody. So learning to hammer this progression now will make you accompaniment sound better immediately and prepare you for playing certain melodies later on.Get your left hand in position to play a C chord, but don't fret the fourthstring just yet.
On the first beat, pick the fourth string without fretting it. | 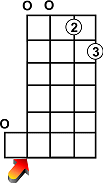 |
Then fret it hard at the second fret, and continue playing the rest of the roll. |  |
| The tab for this measure is shown at the right. To hear this measure repeated four times slowly, click the little banjo icon below:
|  |
Practice playing that measure over and over again. From now on, whenever you play a C with your standard roll, add that "lick."
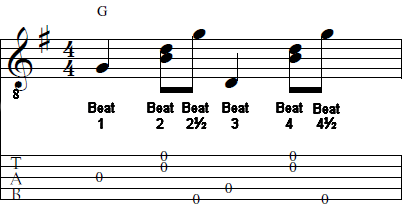
Hammering On a G Chord
Up until now, we've been ignoring your G chord, since it's typically open. Now we're going to add a bluegrass lick to that chord, so it won't feel left out. You won't be able to use this all the time, but you can use it during introductions and instrumental passages.You start by putting your left forefinger on the third fret of the third string. That will actually produce a Bb note, which clashes with the B of a G chord, but it won't clash for long, since it's going to change to a B quickly. Notes that clash temporarily like this, but resolve to a note in the cord are called "passing tones." This particular note is also your first "blue" note - a note that is played a half step down from where would it ordinarily be played. Now put your second finger over the fourth fret of the third string, right above your index finger, but don't fret quite yet. | 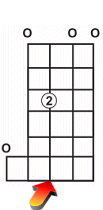 |
Now pick the third string (with it fretted at the third fret), then hammer hard with your second finger on the fourth fret. Then play the rest of your roll. On the second beat, the second string will be open when/if you hit it (depending on your picking style). This will give you two "B" notes ringing at the same time, a sound that's common in Bluegrass banjo solos. For now, beat two will start with playing the third string open just like we learned back at the start. Also for now, play the second half of the measure the same way you played the first half. |  |
| The tab for this measure is shown at the right. To hear this measure repeated four times slowly, click the little banjo icon below:
|  |
Practice playing that measure over and over again. Get used to that lick, you'll use it a lot when you play melodies later on.
Now, we'll add another more "hammer on" to your G chord. This one includes the Low D to Low E note progression that is used in countless American folk songs. Like the similar progression on C, learning this pattern in G will add variety to your accompaniments now and help you play many melodies later on. Start the measure by playing one beat's worth of your normal roll pattern on G (without the hammering pattern we just showed you). But get ready to fret the fourth string at the second fret (like you did when you hammered on the fourth string in your C chord above). On beat 2, play the fourth string open, then fret it at the second fret hard. Continue with your normal roll pattern. Then repeat the same pattern for the second half of the measure. You may or may not like this pattern; not everyone uses it.
Finally, just for the fun of it we'll combine these two patterns on the G chord. Put the Bb to B pattern on the first beat, play a normal G pattern (starting on the third string) on the second beat, then play the low D to E pattern on the third beat (starting on the fourth string), then repeat the normal G pattern on the fourth beat.
You start with all strings open. Hold a finger over the second fret on the fourth string, ready to hammer. Play the fourth string open, producing a D note. |  |
Now hammer hard on the second fret of the fourth string, which will produce an E. For now, beat two will continue the same as beat two in the previous example. Also for now, play the second half of the measure the same way you played the first half. |  |
| The tab for this measure is shown at the right. To hear this measure repeated four times slowly, click the little banjo icon below:
|  |
Practice playing that measure over and over again. Get used to that lick, you'll use it a lot when you play melodies later on.
| Now let's combine these two patterns on your G chord. To hear these measures repeated slowly, click the little banjo icon below:
|  |
Just for the fun of it, I have strung together the patterns that you learned above and sped them up to a reasonable (not a breakneck) speed, so you can hear how these things come together. To hear the sample, click the little banjo icon:

Practice all of these patterns until you can add them to your rolls without even thinking about them. In the next lesson, you will learn about "pulling off," another way to add notes with your left hand.
Conclusion
Go back to the songs you learned or tried in Lesson 2 and add the "hammering on" licks we presented in this lesson. Sing along. Don't feel bad if it takes you a while to get used to this. It's 90% learning it so well your hands can do it while you're thinking about something else.In our next lesson, we'll show how these techniques will help you play the melody on many classic folk and Bluegrass songs. I'll warn you now, our end game is to get you ready to play a lot of songs we plan to put up eventually, and to read the tabs other folks have already posted.
In the meantime please contact us if you have any questions or hit any brick walls.
All material, illustrations, and content of this web site is copyrighted © 2001, 2002, 2003, 2004, 2005, 2006,
2007, 2008, 2009, 2010, 2011, 2012, 2013, 2014, 2015 by Paul D. Race. All rights reserved.
Creek Dont' Rise(tm) is a participant in the Amazon Services LLC Associates Program, an affiliate advertising
program designed to provide a means for sites to earn advertising fees by advertising and linking to Amazon.com.
For questions, comments, suggestions, trouble reports, etc. about this play or about this web page, please contact us.
| Visit related pages and affiliated sites: | ||||||
| - Music - | ||||||

|
 |
 |

|

|

|
|

|

|

|

|

|

|
|
| - Trains and Hobbies - | ||||||
 |

|

|  |
 |

|
|
| - Christmas Memories and Collectibles - | ||||||
 |

|
 |

|

|
||
| - Family Activities and Crafts - | ||||||
 |

|

|

|

|

|
|